Hello everyone, I’d really appreciate it if anyone has fixture profiles to share for the following:
- Chauvet Color Strike M
- Chauvet COLORado PXL Bar 16
Thankyou so much!!!
Hello everyone, I’d really appreciate it if anyone has fixture profiles to share for the following:
Thankyou so much!!!
Hi @ethermachines,
Both of these fixtures have many DMX modes, so I picked two that I thought were good universal options, but let me know if you wanted to use some other modes.
See DMX Chart / manual for reference.
Configure the fixture to use the 74-channel mode and choose the desired starting DMX address on the unit itself.
Add the files to the Fixture Profiles/User folder, which you can find by going to Beam > Fixture Profiles… and restart Beam.
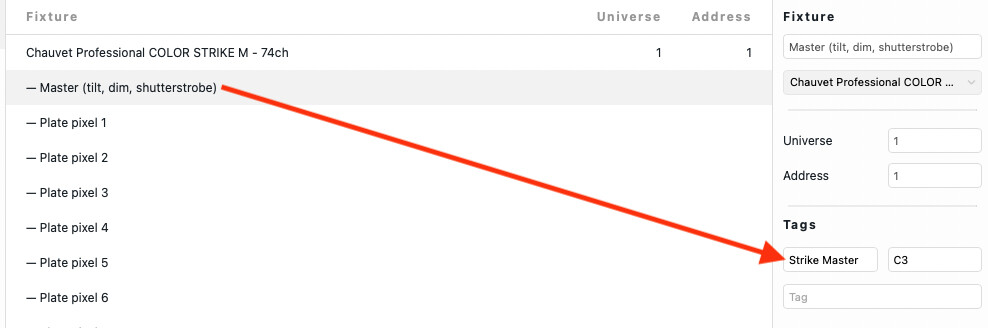
Add the Chauvet Professional COLOR STRIKE M - 74ch to your patch at the starting address matching the one set on the unit, without adding any tags to it just yet.
Double-click on the added fixture to expand it and add a Strike Master tag to the Master (tilt, dim, shutterstrobe) sub-fixture:
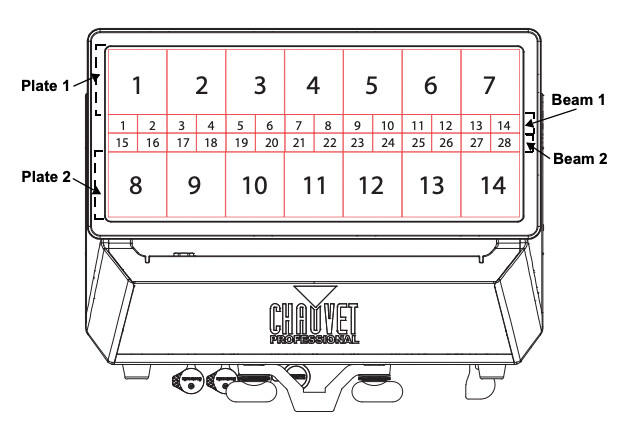
Add a Strike Plate tag to control the Plate pixel 1-14 sub-fixtures.
Add a Strike Beam tag to control the Beam pixel 1-28 sub-fixtures.
(go to Live)
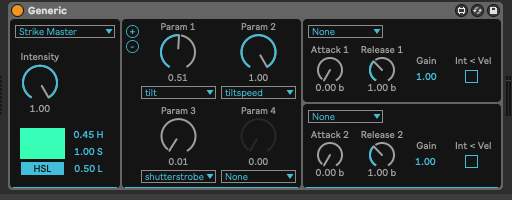
Add a Generic device, select Strike Master, set Intensity to 100% and select tilt, tiltspeed, shutterstrobe in the middle panel. Use this to control master parameters of the fixture.
Add a Par device, select Strike Plate. Use this to control intensity and color of the Plate segments.
Add a Par device, select Strike Beam. Use this to control intensity of the Beam segments.
See DMX Chart / manual for reference.
In the Dual Control mode the fixture is split into two parts - Movement and Pixels. You need to select the (sub)mode and set address for each part separately.
Fixture Profiles/User folder, which you can find by going to Beam > Fixture Profiles… and restart Beam.Chauvet Professional COLORado PXL Bar 16 - Dual Control Movement - 8ch to your patch at the address matching the starting address of the Movement part set on the unit. Assign a PXL Move tag to it.Chauvet Professional COLORado PXL Bar 16 - Dual Control Pixels - 64ch to your patch at the address matching the starting address of the Pixels part set on the unit. Assign a PXL Pixels tag to it.(go to Live)
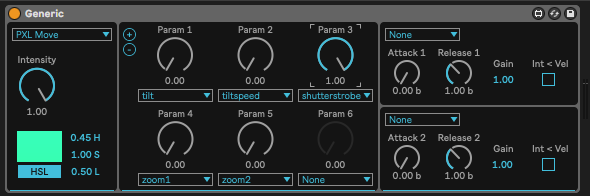
Add a Generic device, select PXL Move, set Intensity to 100% and select tilt, tiltspeed, shutterstrobe, zoom1, zoom2 in the middle panel. Use this to control the Movement/master parameters of the fixture.
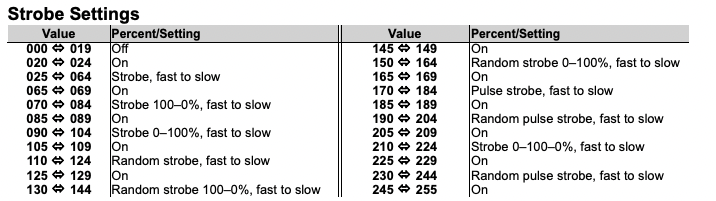
Keep in mind that the shutterstrobe needs to be at On (e.g. 100% = DMX value 255) in order for the fixture to turn on:
Add a Par device, select PXL Pixels. Use this to control the Pixels.
Also check out this video for some ideas on working with pixel bars in Beam / Live.
Let me know if this works for you or need any further help!
Thankyou SO MUCH Luka. Much appreciated for all the extra detail too- really ![]()
![]()
![]()