Wondering if someone can help create a proper fixture profile for my Eliminator Stealth Wash Zoom moving heads and my Eliminator Furious 5? Using Beam 2.0 for Live.
Hi @musentpro, thanks for getting in touch!
When asking for help in this section, please always attach your own fixture profile attempts.
You can create fixture profiles yourself using the Beam Fixture Editor. If you’re new to this, check out the manual.
If you get stuck, please share your fixture profile file (.sbf), a clear explanation of any issues you’re facing, what you’ve already tried, and any relevant screenshots. We will be glad to help you.
Eliminator Stealth Wash Zoom_V2.sbf (2.8 KB)
Here’s the 2nd one I got some help building, but it still doesn;t work correctly.
Hey @musentpro,
Thank you for sharing the fixture profile, this is already a great start. The reason why you are unable to fully control your fixture with it is because you have not assigned any Mappings to some of the important Channels. Any channels that you want to control with Beam need to be exposed as named Modulations or, when relevant, referenced as Intensity & Color components.
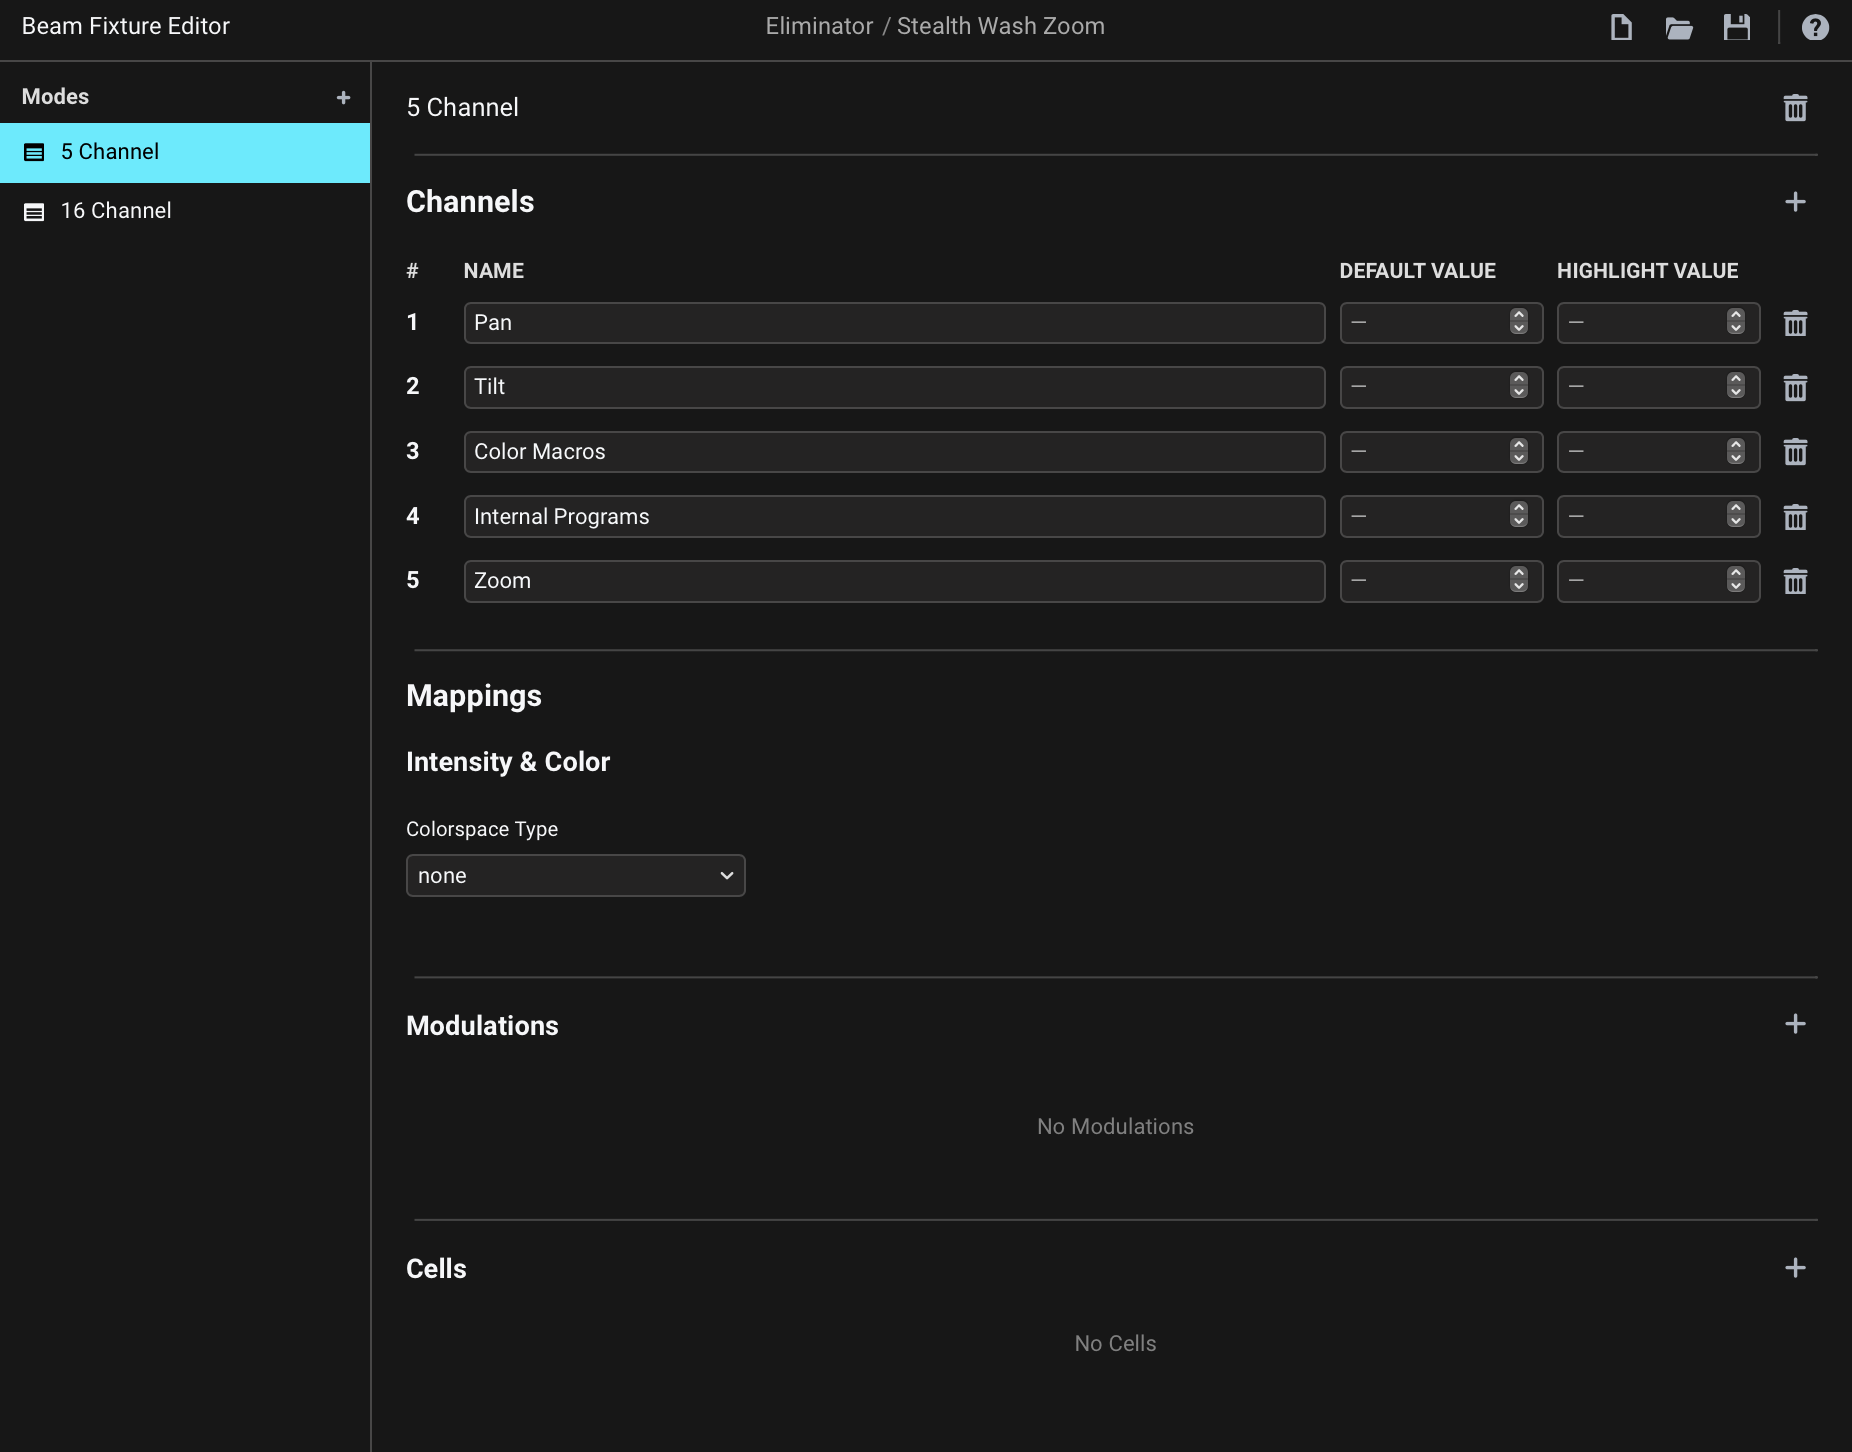
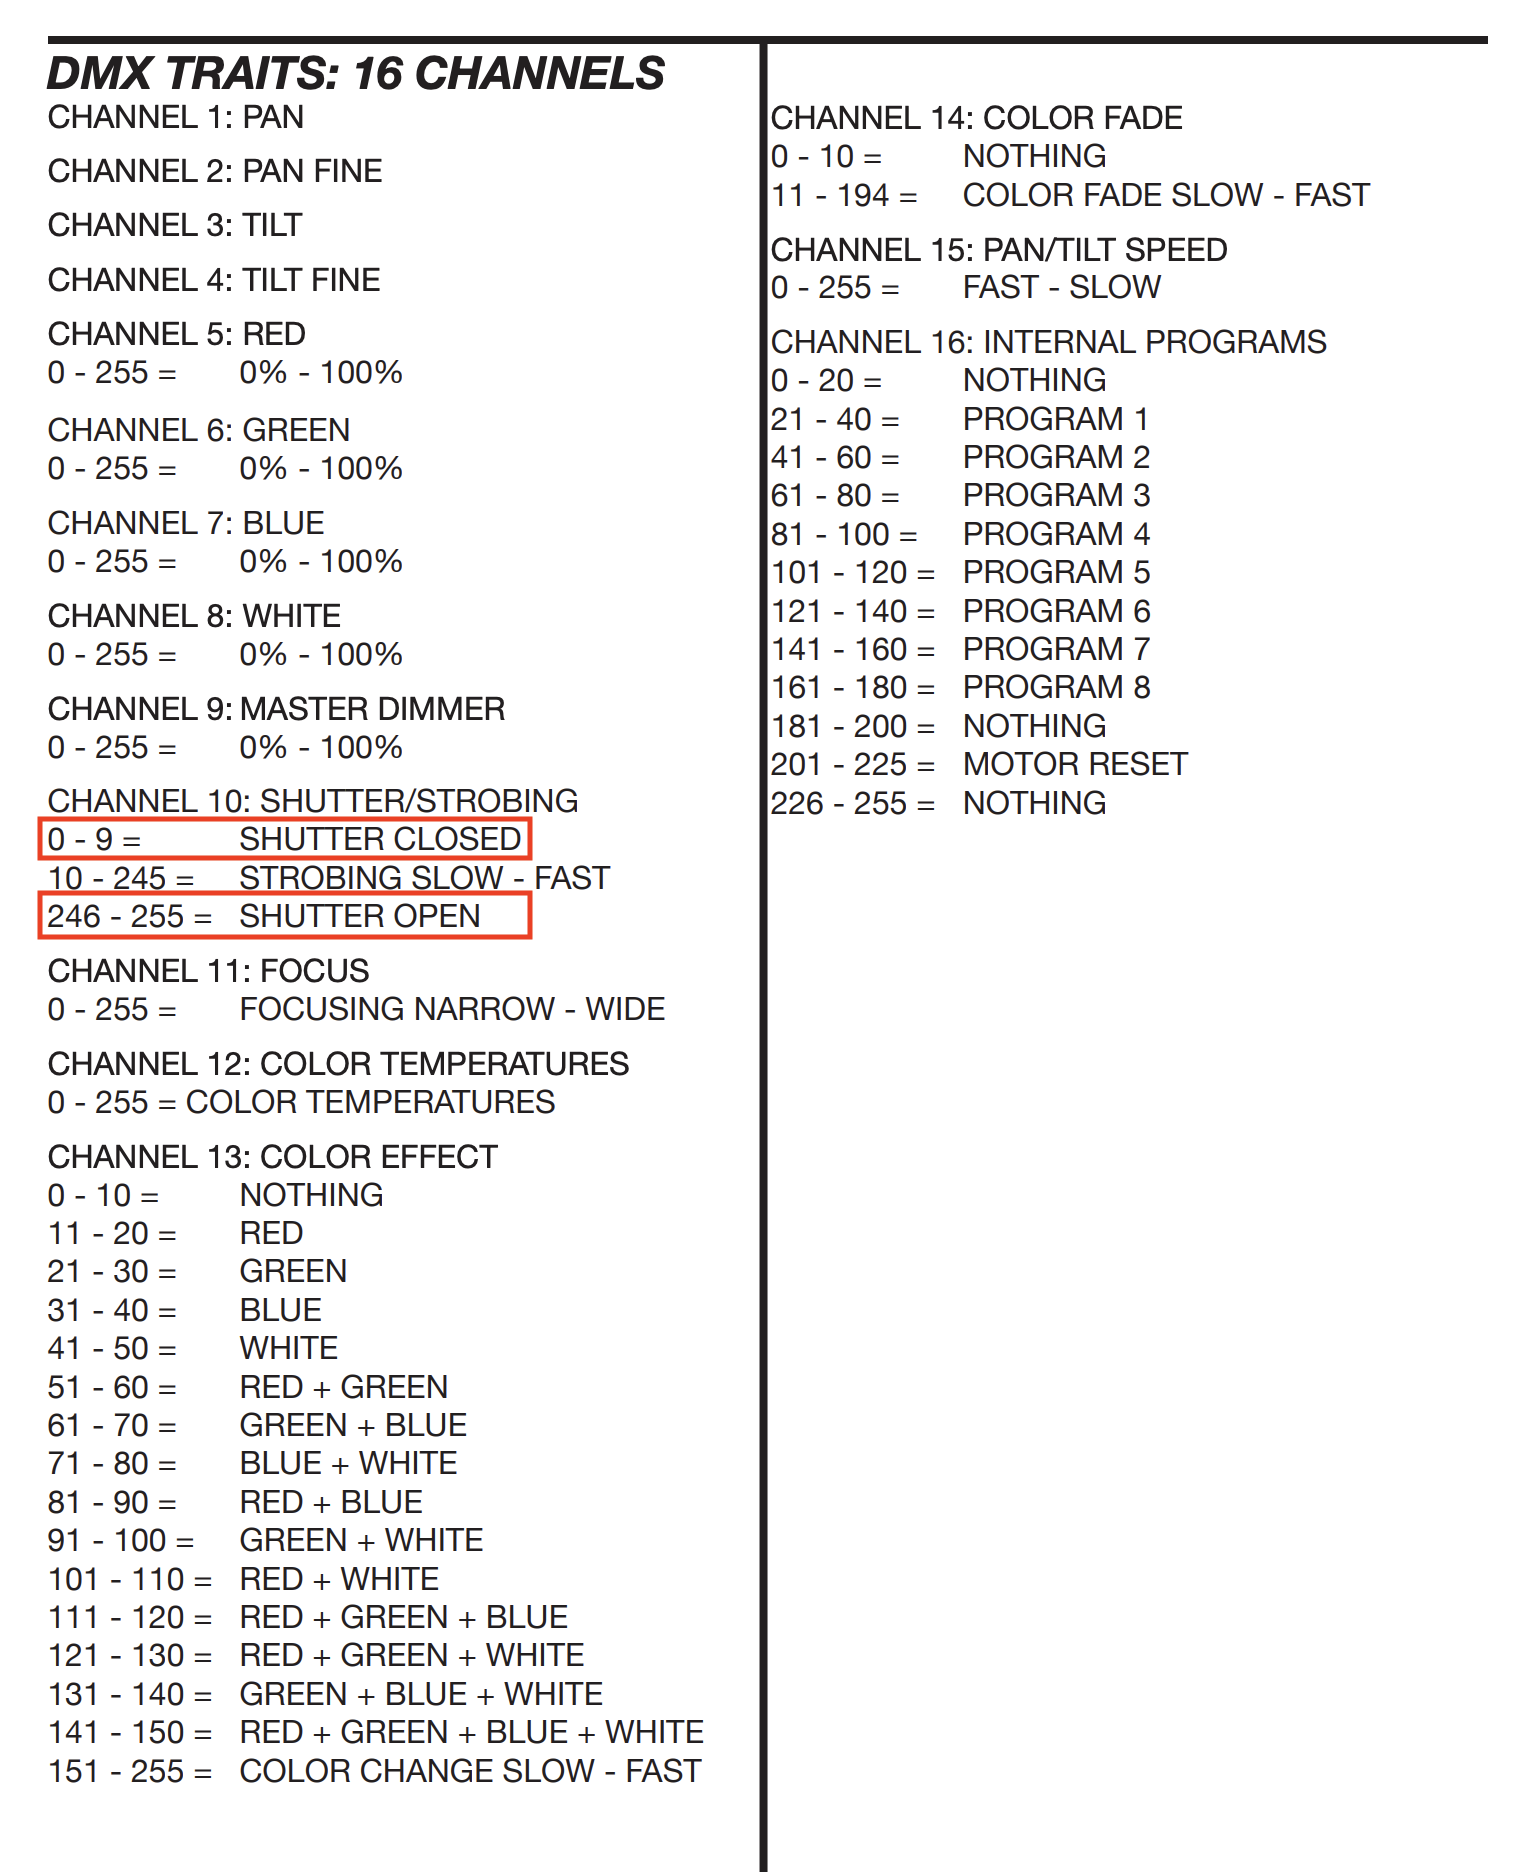
5-channel mode
Starting with the 5 Channel mode, here you only added channels, but no modulations, so there is currently nothing available to control with Beam:
After adding Modulation control keyword to each of the available channels we want to control, these will appear as parameters that you can select in Beam Instrument and Effect devices in Live (e.g. Generic):
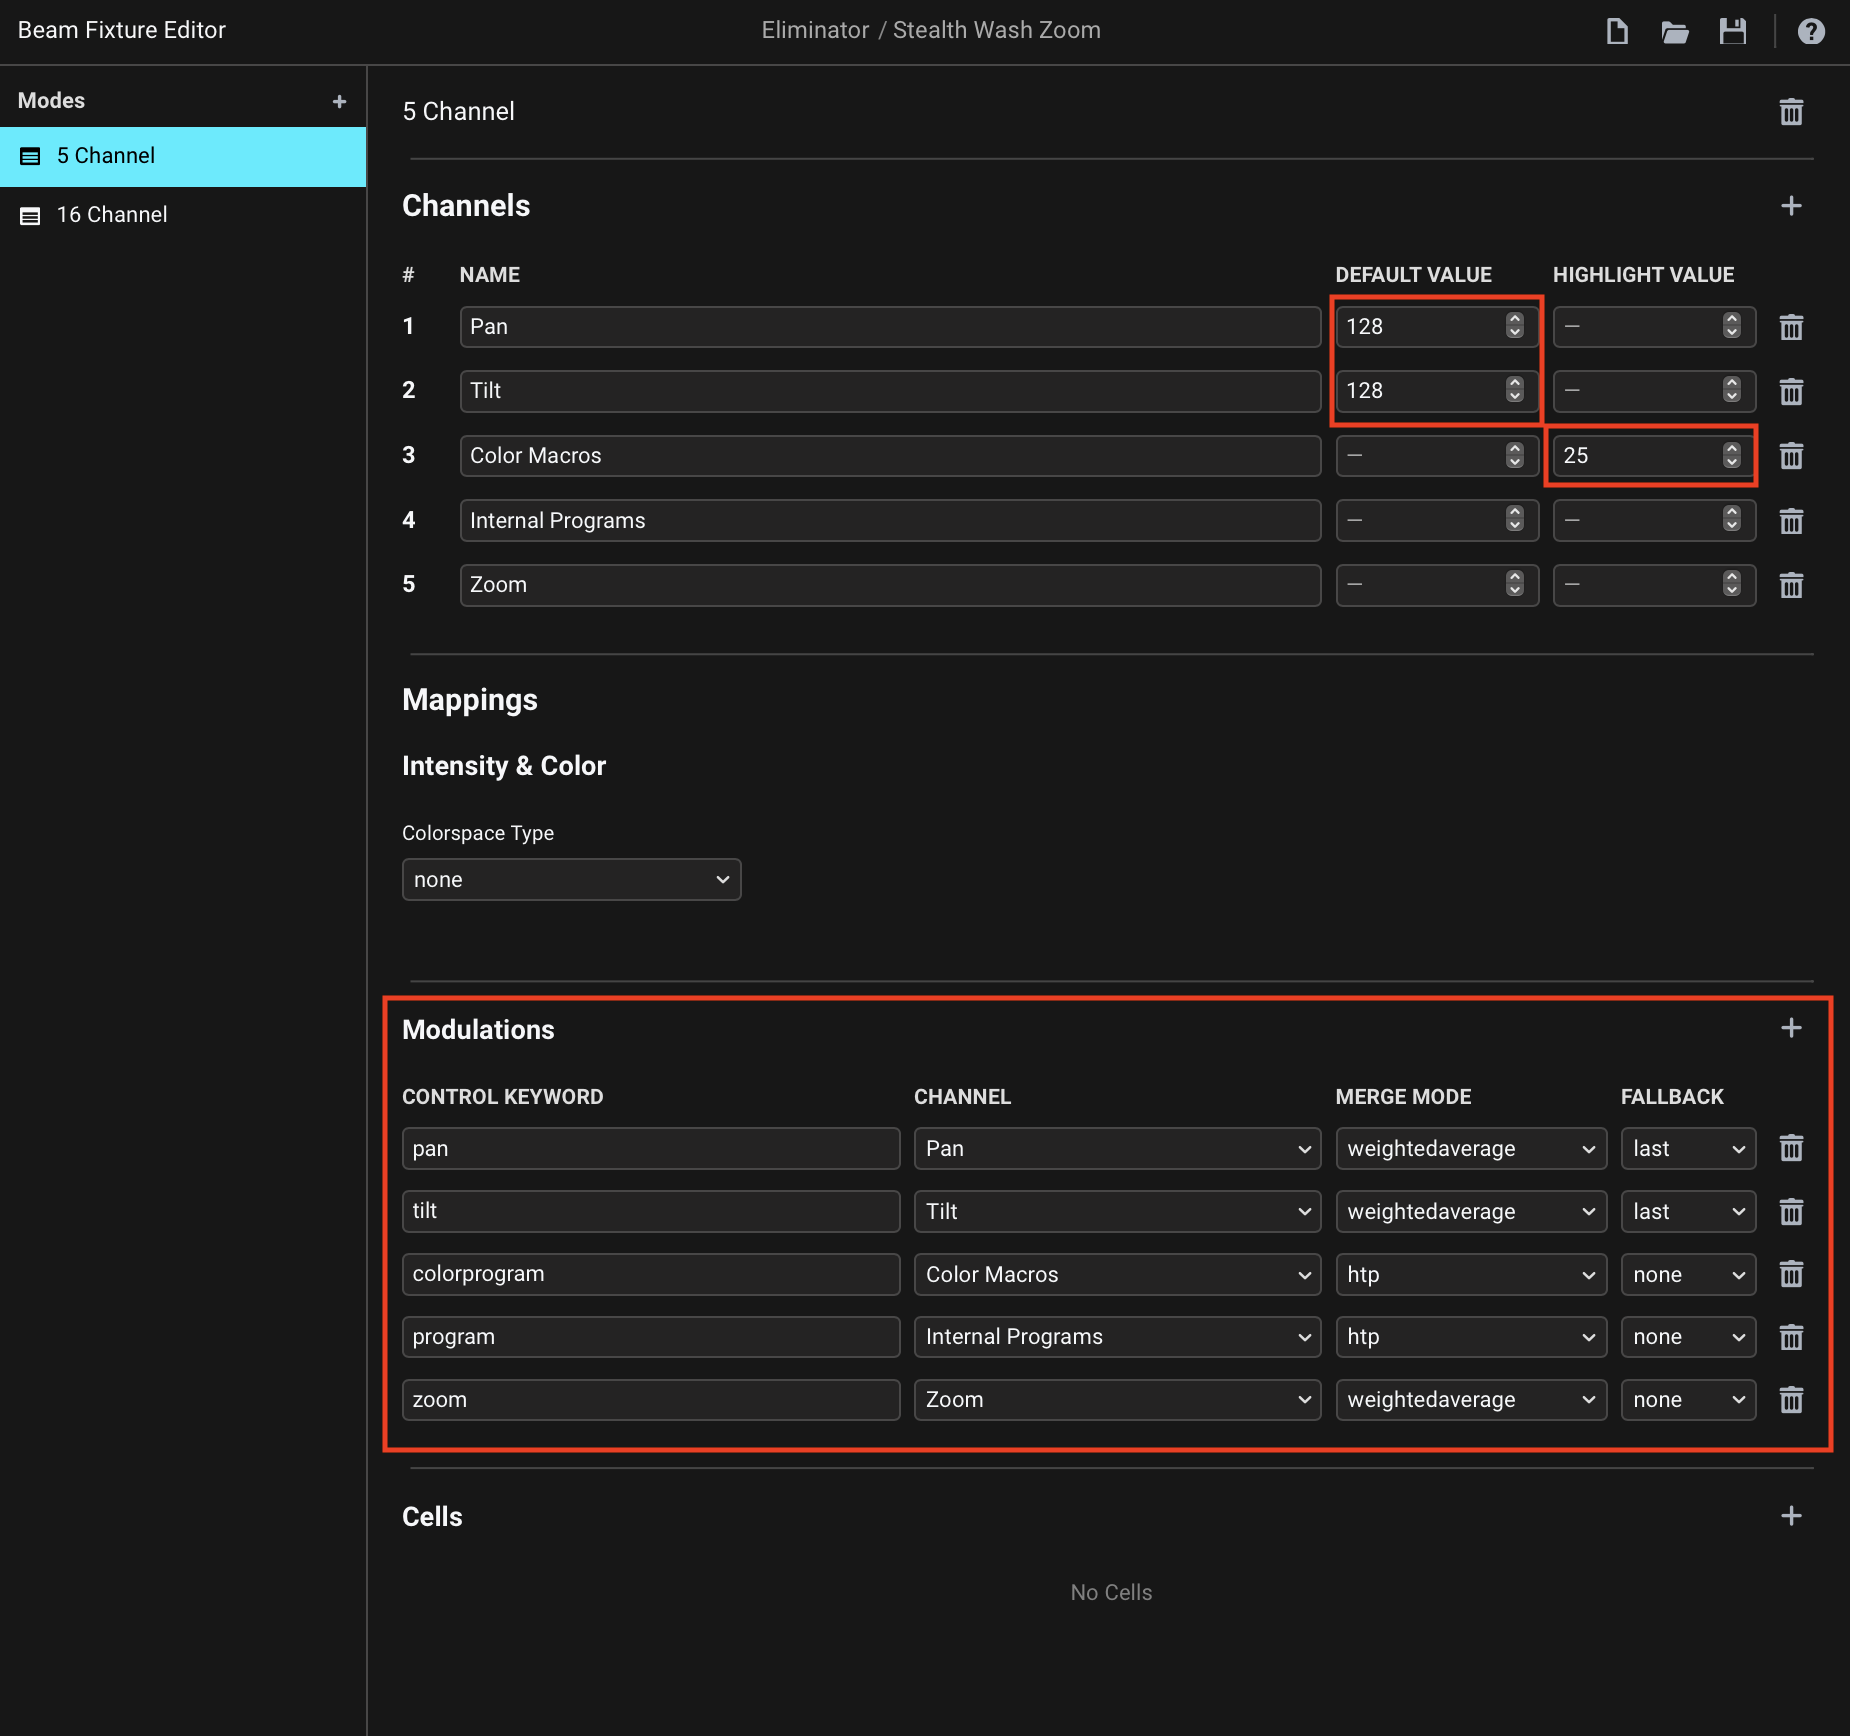
If you are wondering why I used these particular Merge Mode and Fallback options, check out this section of the manual.
Besides this, you will also notice two changes in the Channels part:
-
I set the Default Value of
PanandTiltto128, which is in the middle of the 0-255 DMX channel range. The Default Value determines what happens when you are not controlling the channel with any Modulations, e.g. when your Live Set doesn’t yet contain any Beam devices controlling this particular fixture. In this case, this ensures that the moving head is in a neutral position by default. -
I set the Highlight Value of
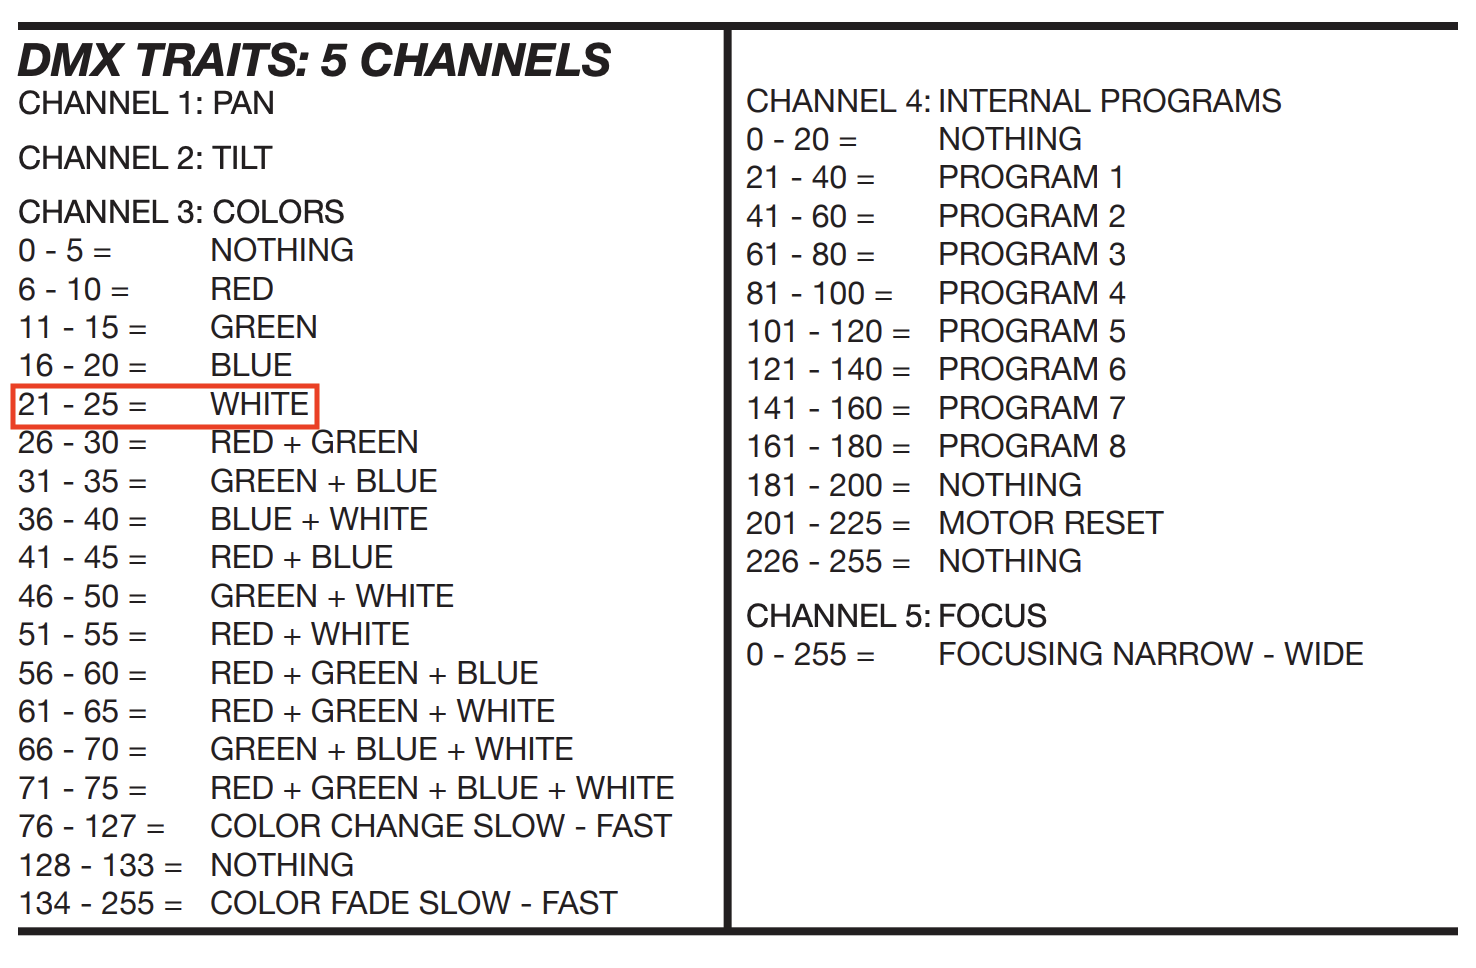
Color Macroschannel to25, which corresponds to White:This ensures that the fixture lights up when you activate the Test toggle for it in the Beam application.
While you can first add the Channels and assign the corresponding Mappings afterwards, as I did here, you can speed things up quite a bit with the Add Premapped Channels functionality. This adds pre-configured Channels and Mappings for common channel functions in one go:
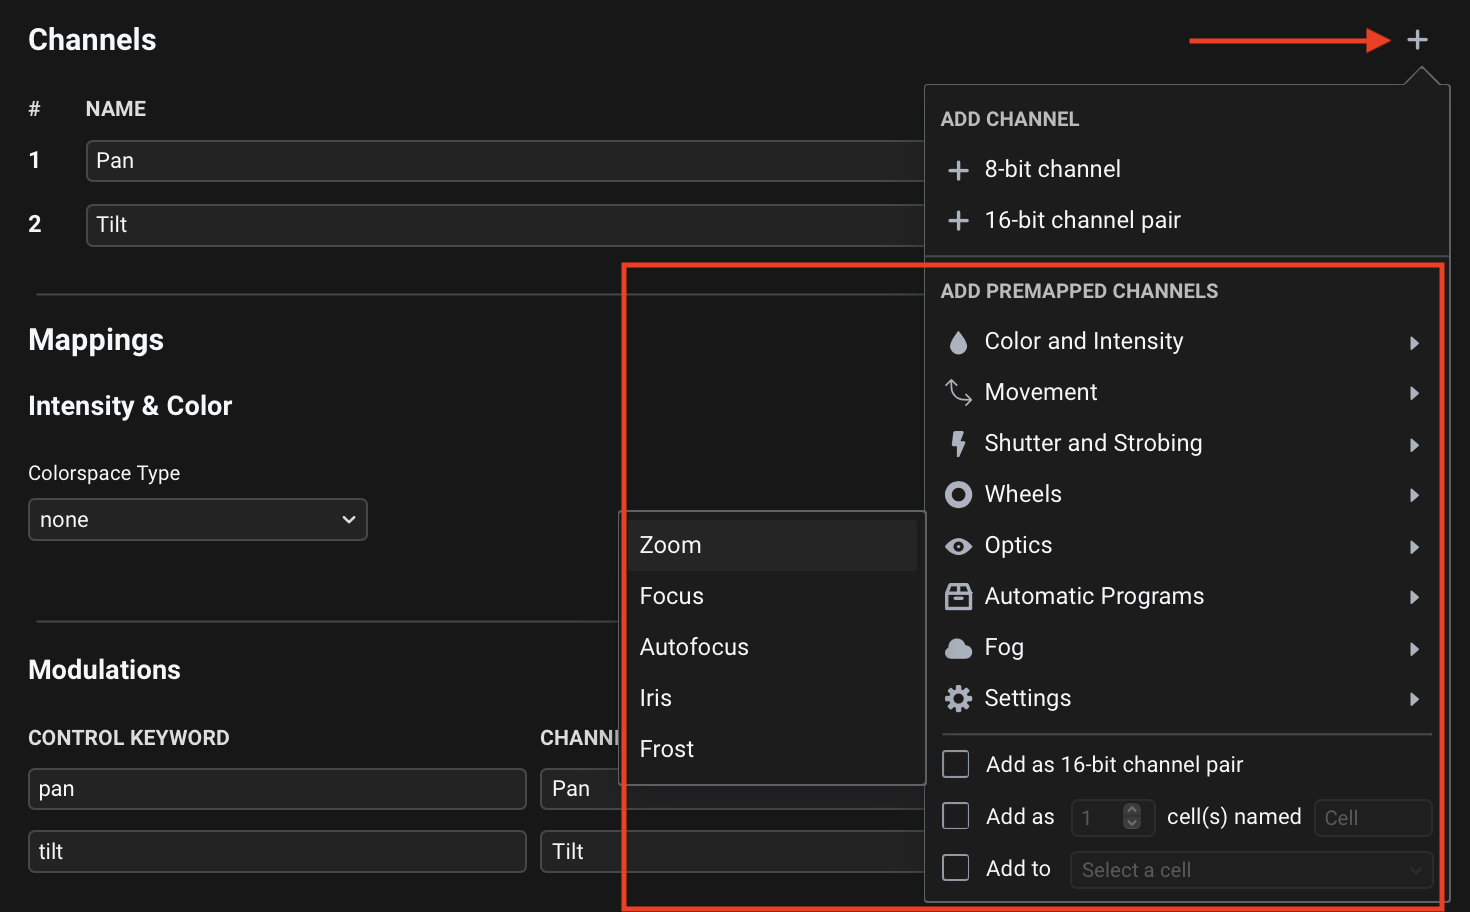
You can read more about this in the dedicated article in the manual.
I’m thinking you might have already discovered this functionality and used it to add Channels and Mappings in the next mode.
16-channel mode
The 16 Channel mode is more complete and already contains correctly assigned Mappings for the majority of the Channels.
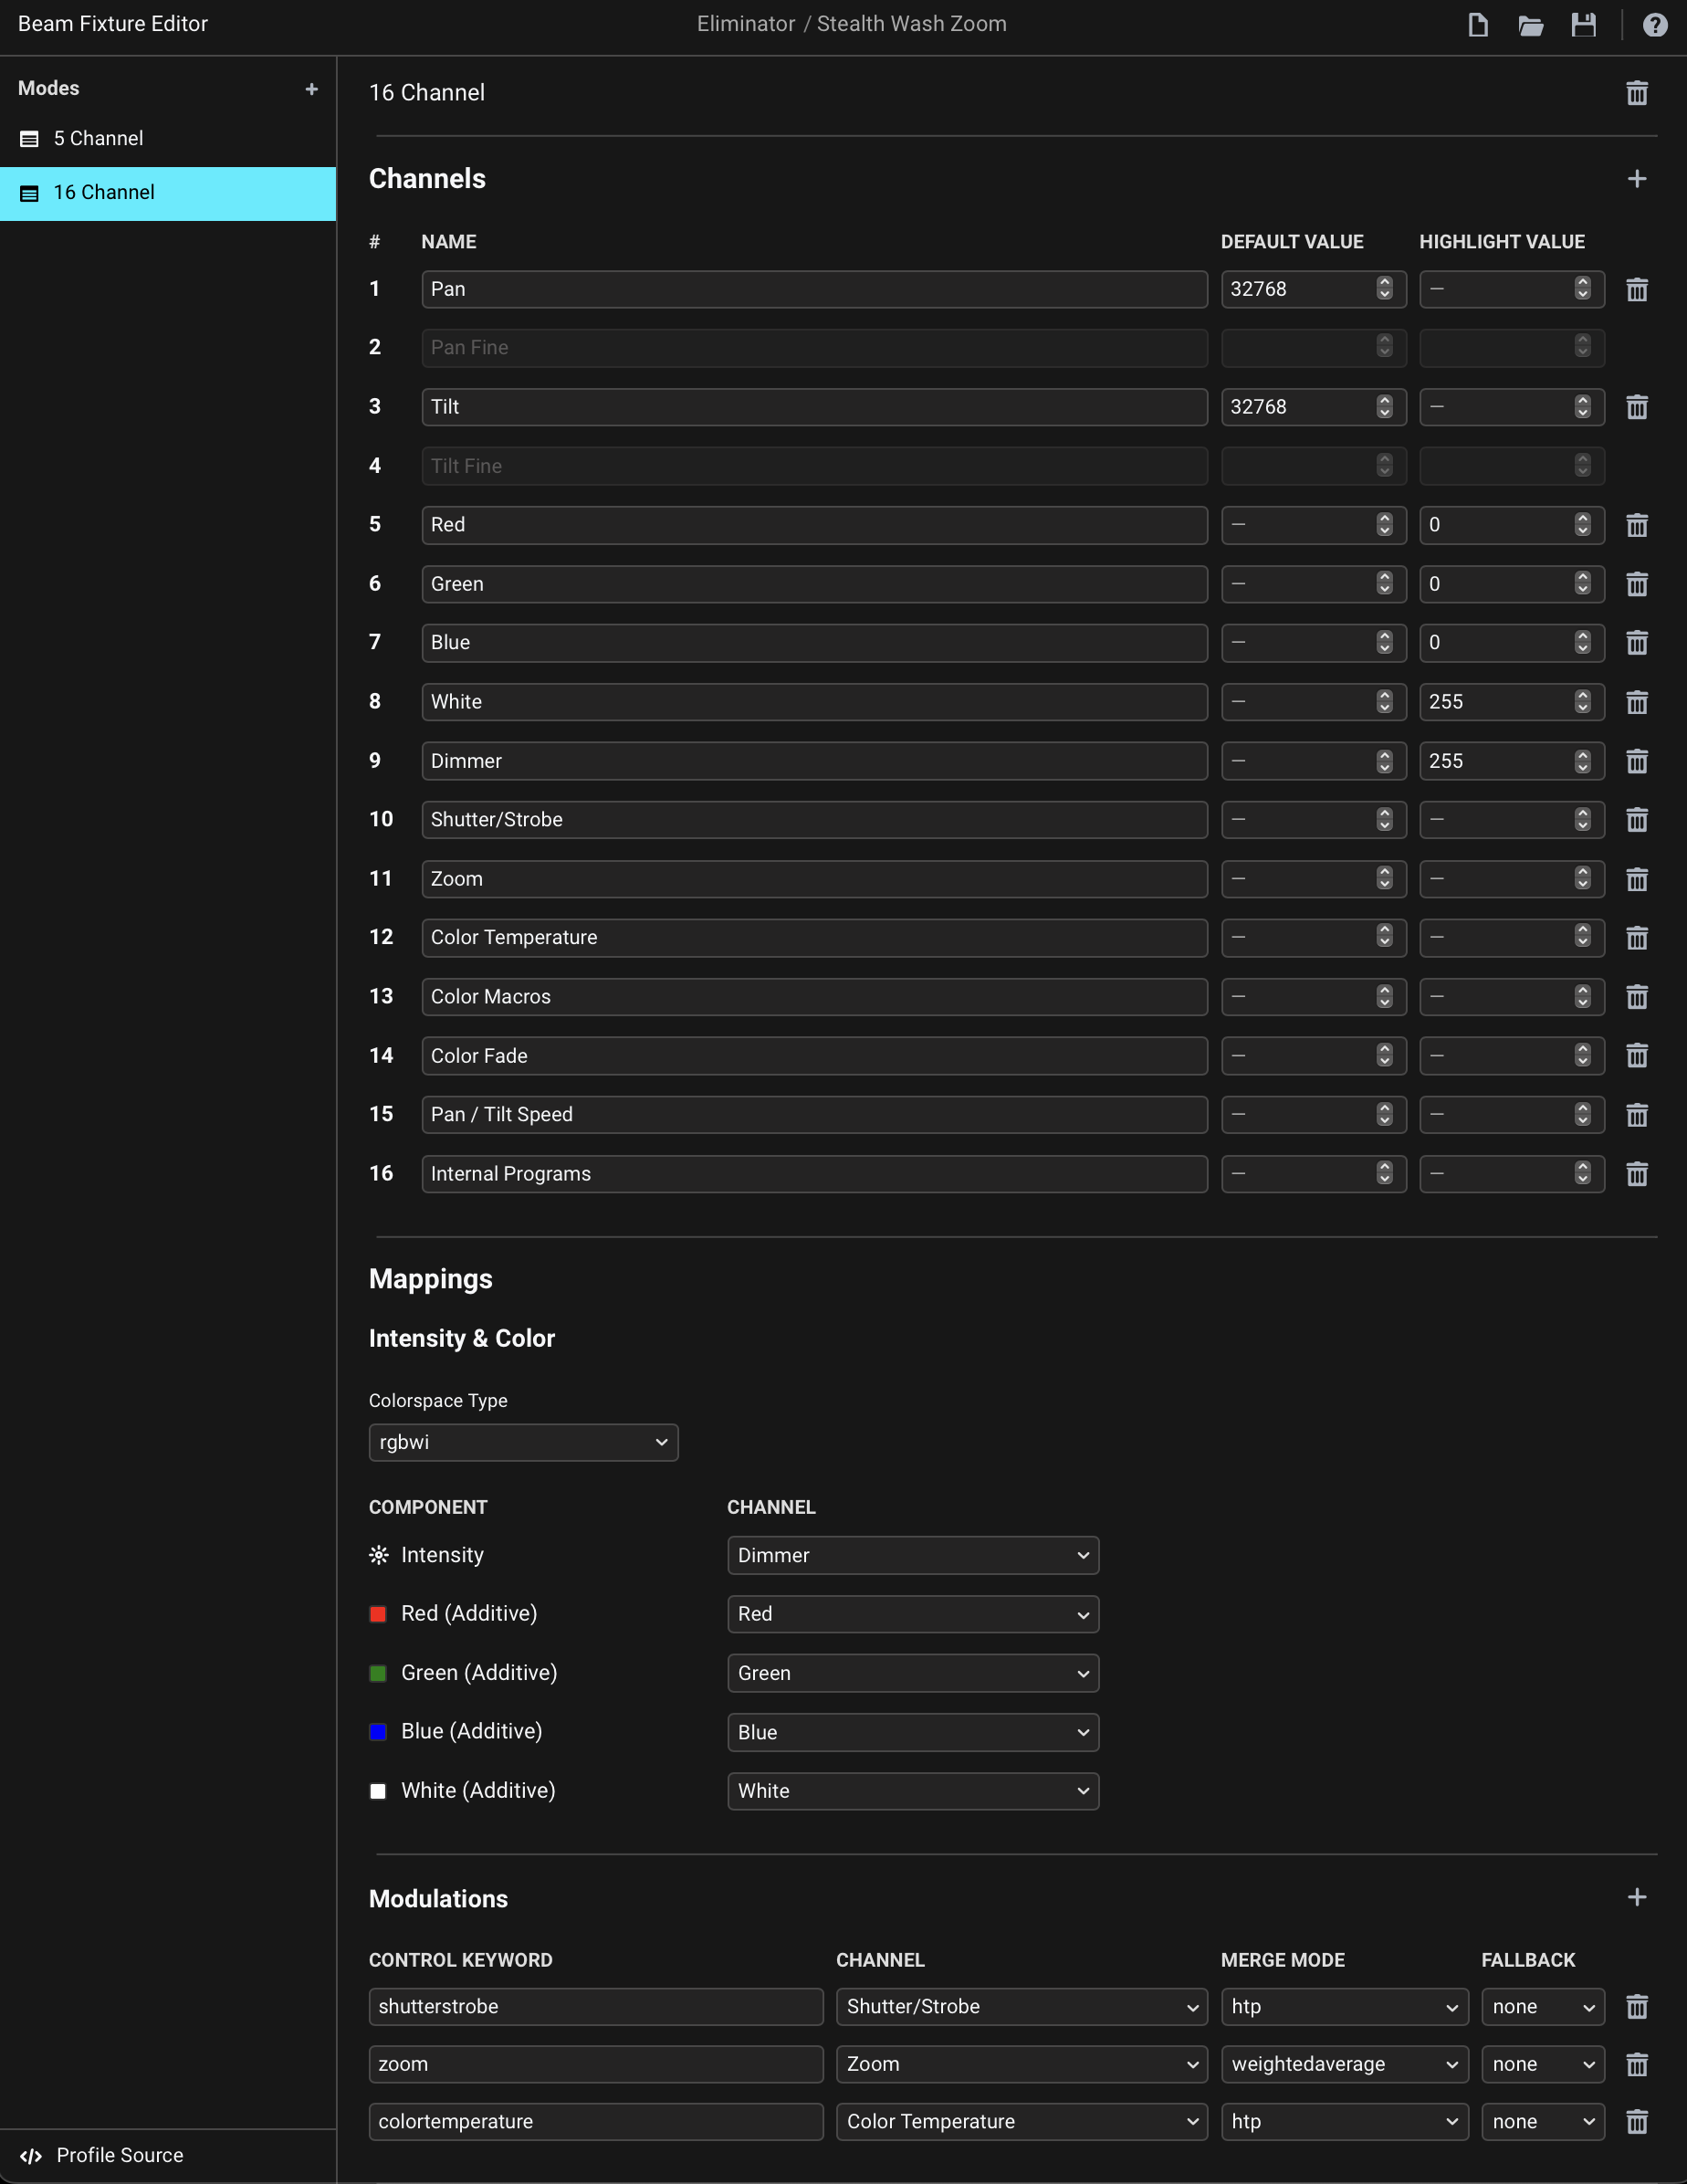
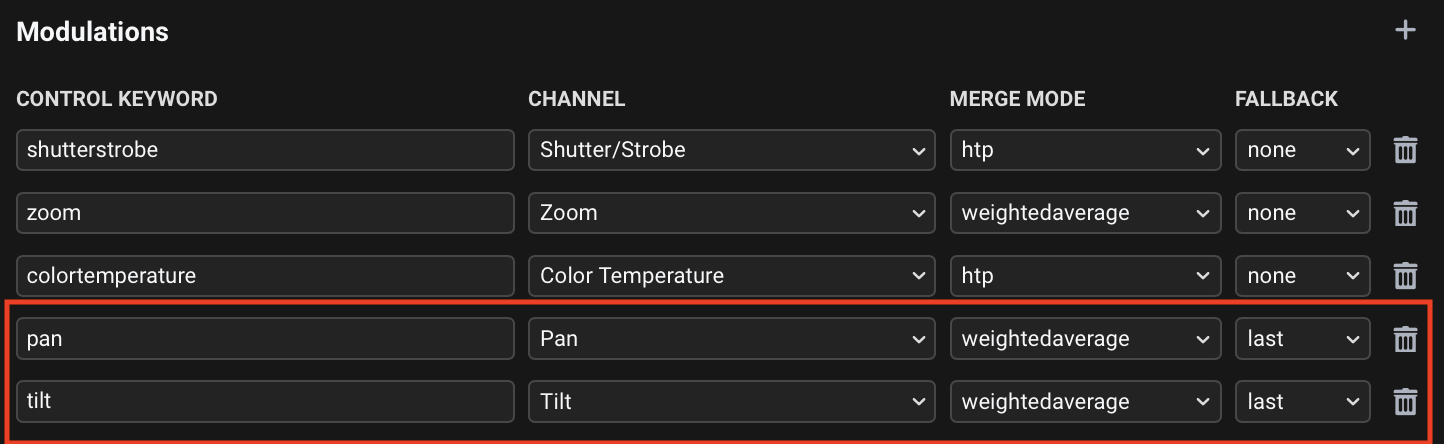
The main thing that’s missing here are the pan and tilt modulation control keywords. After adding these, you should be able to move your fixture:
Additionally, you can also add Modulations to control the Pan / Tilt Speed, Color Macros, Color Fade and Internal Programs channels, although you might not end up using these at all, as using the default fastest P/T Speed setting is probably already what you want most of the time, and color is something you have a more direct control over through the dedicated color channels (e.g. through the RGB/HSL parameters on Beam devices).
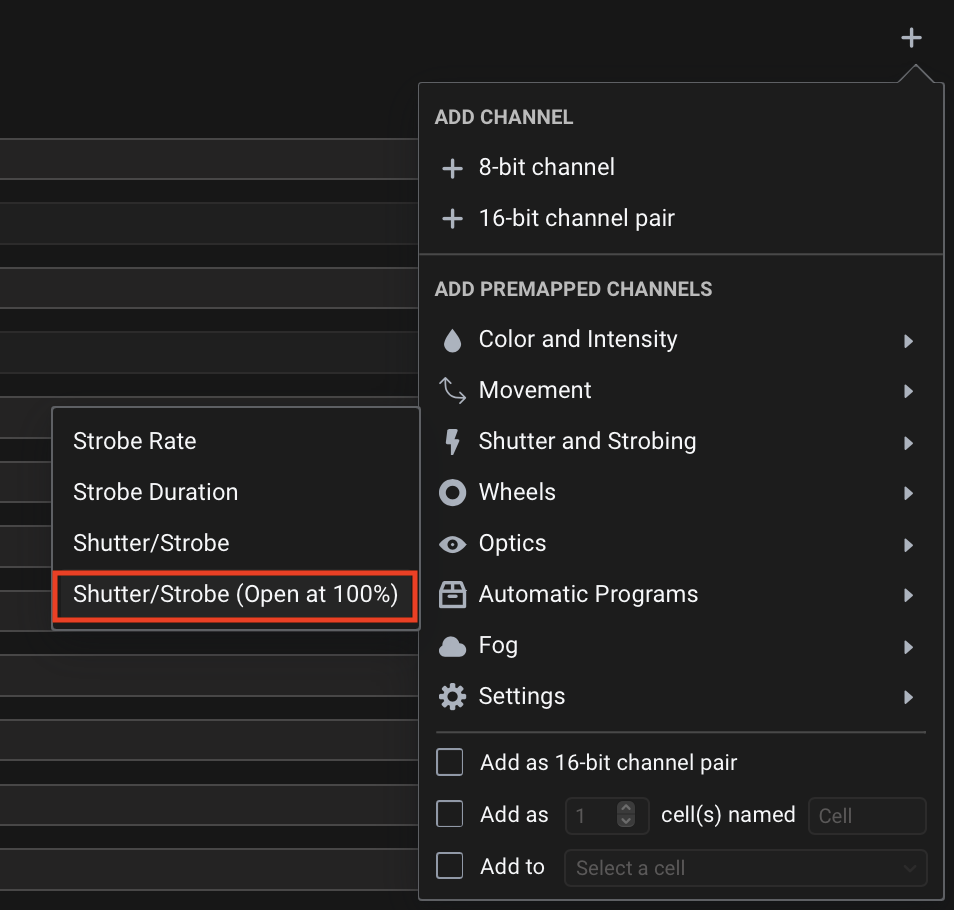
Last, but not least, I would suggest setting the Default Value of the Shutter/Strobe channel to 255, to ensure that the fixture can turn on even when you are not explicitly controlling the shutterstrobe modulation and setting it to 1.0. Setting Highlight Value to 255 ensures that it turns on when activating Test for it in the Beam application:
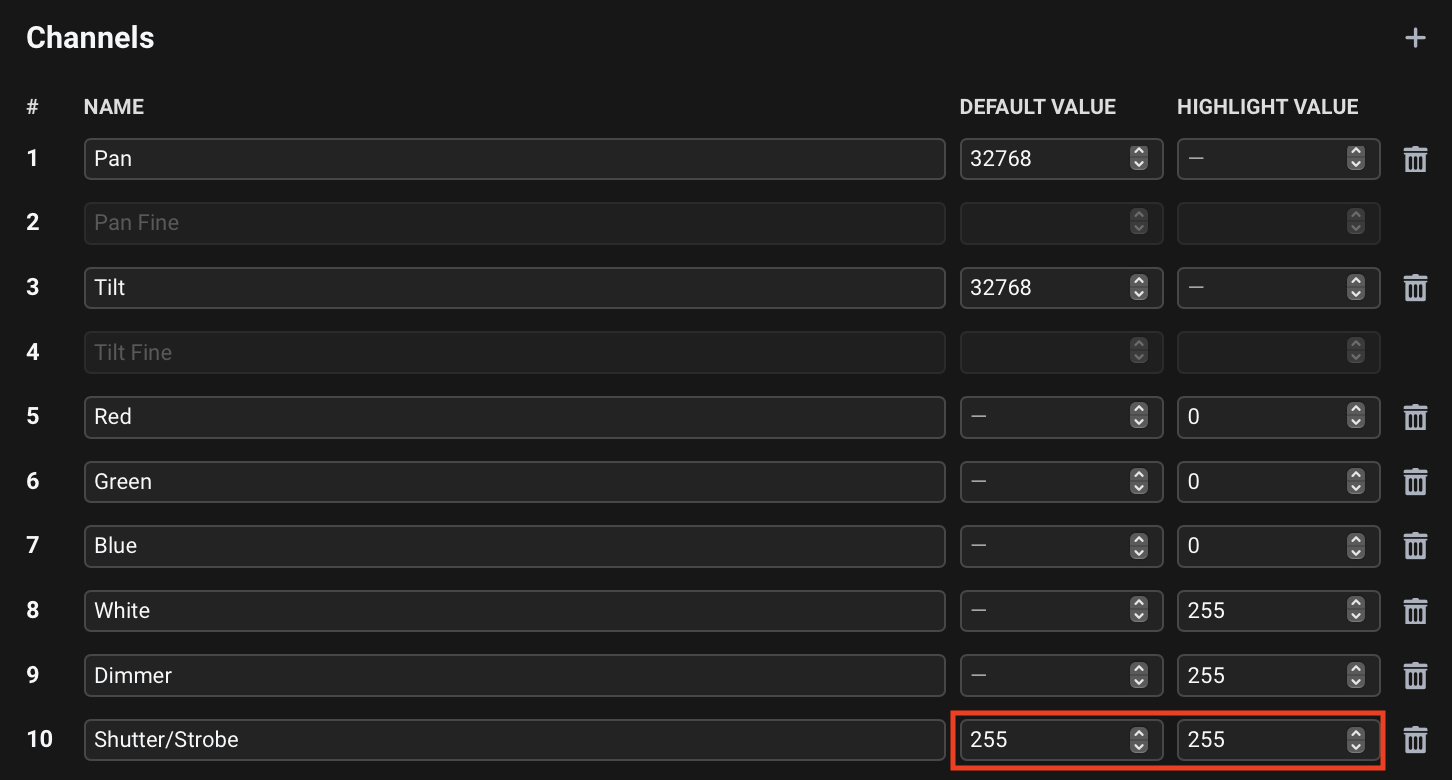
This is necessary because when this channel is set to the DMX value of 0, the shutter of the fixture is closed. It needs to be set to a DMX value in a 246-255 range (modulation values 0.96 - 1.0):
You can use the Shutter/Strobe (Open at 100%) preset whenever you encounter a Shutter/Strobe channel that’s programmed in this way:
Here is the final result: Eliminator Lighting Stealth Wash Zoom.sbf (4.4 KB)
When testing a simulated version of this fixture in the Capture visualizer it now responds as expected:
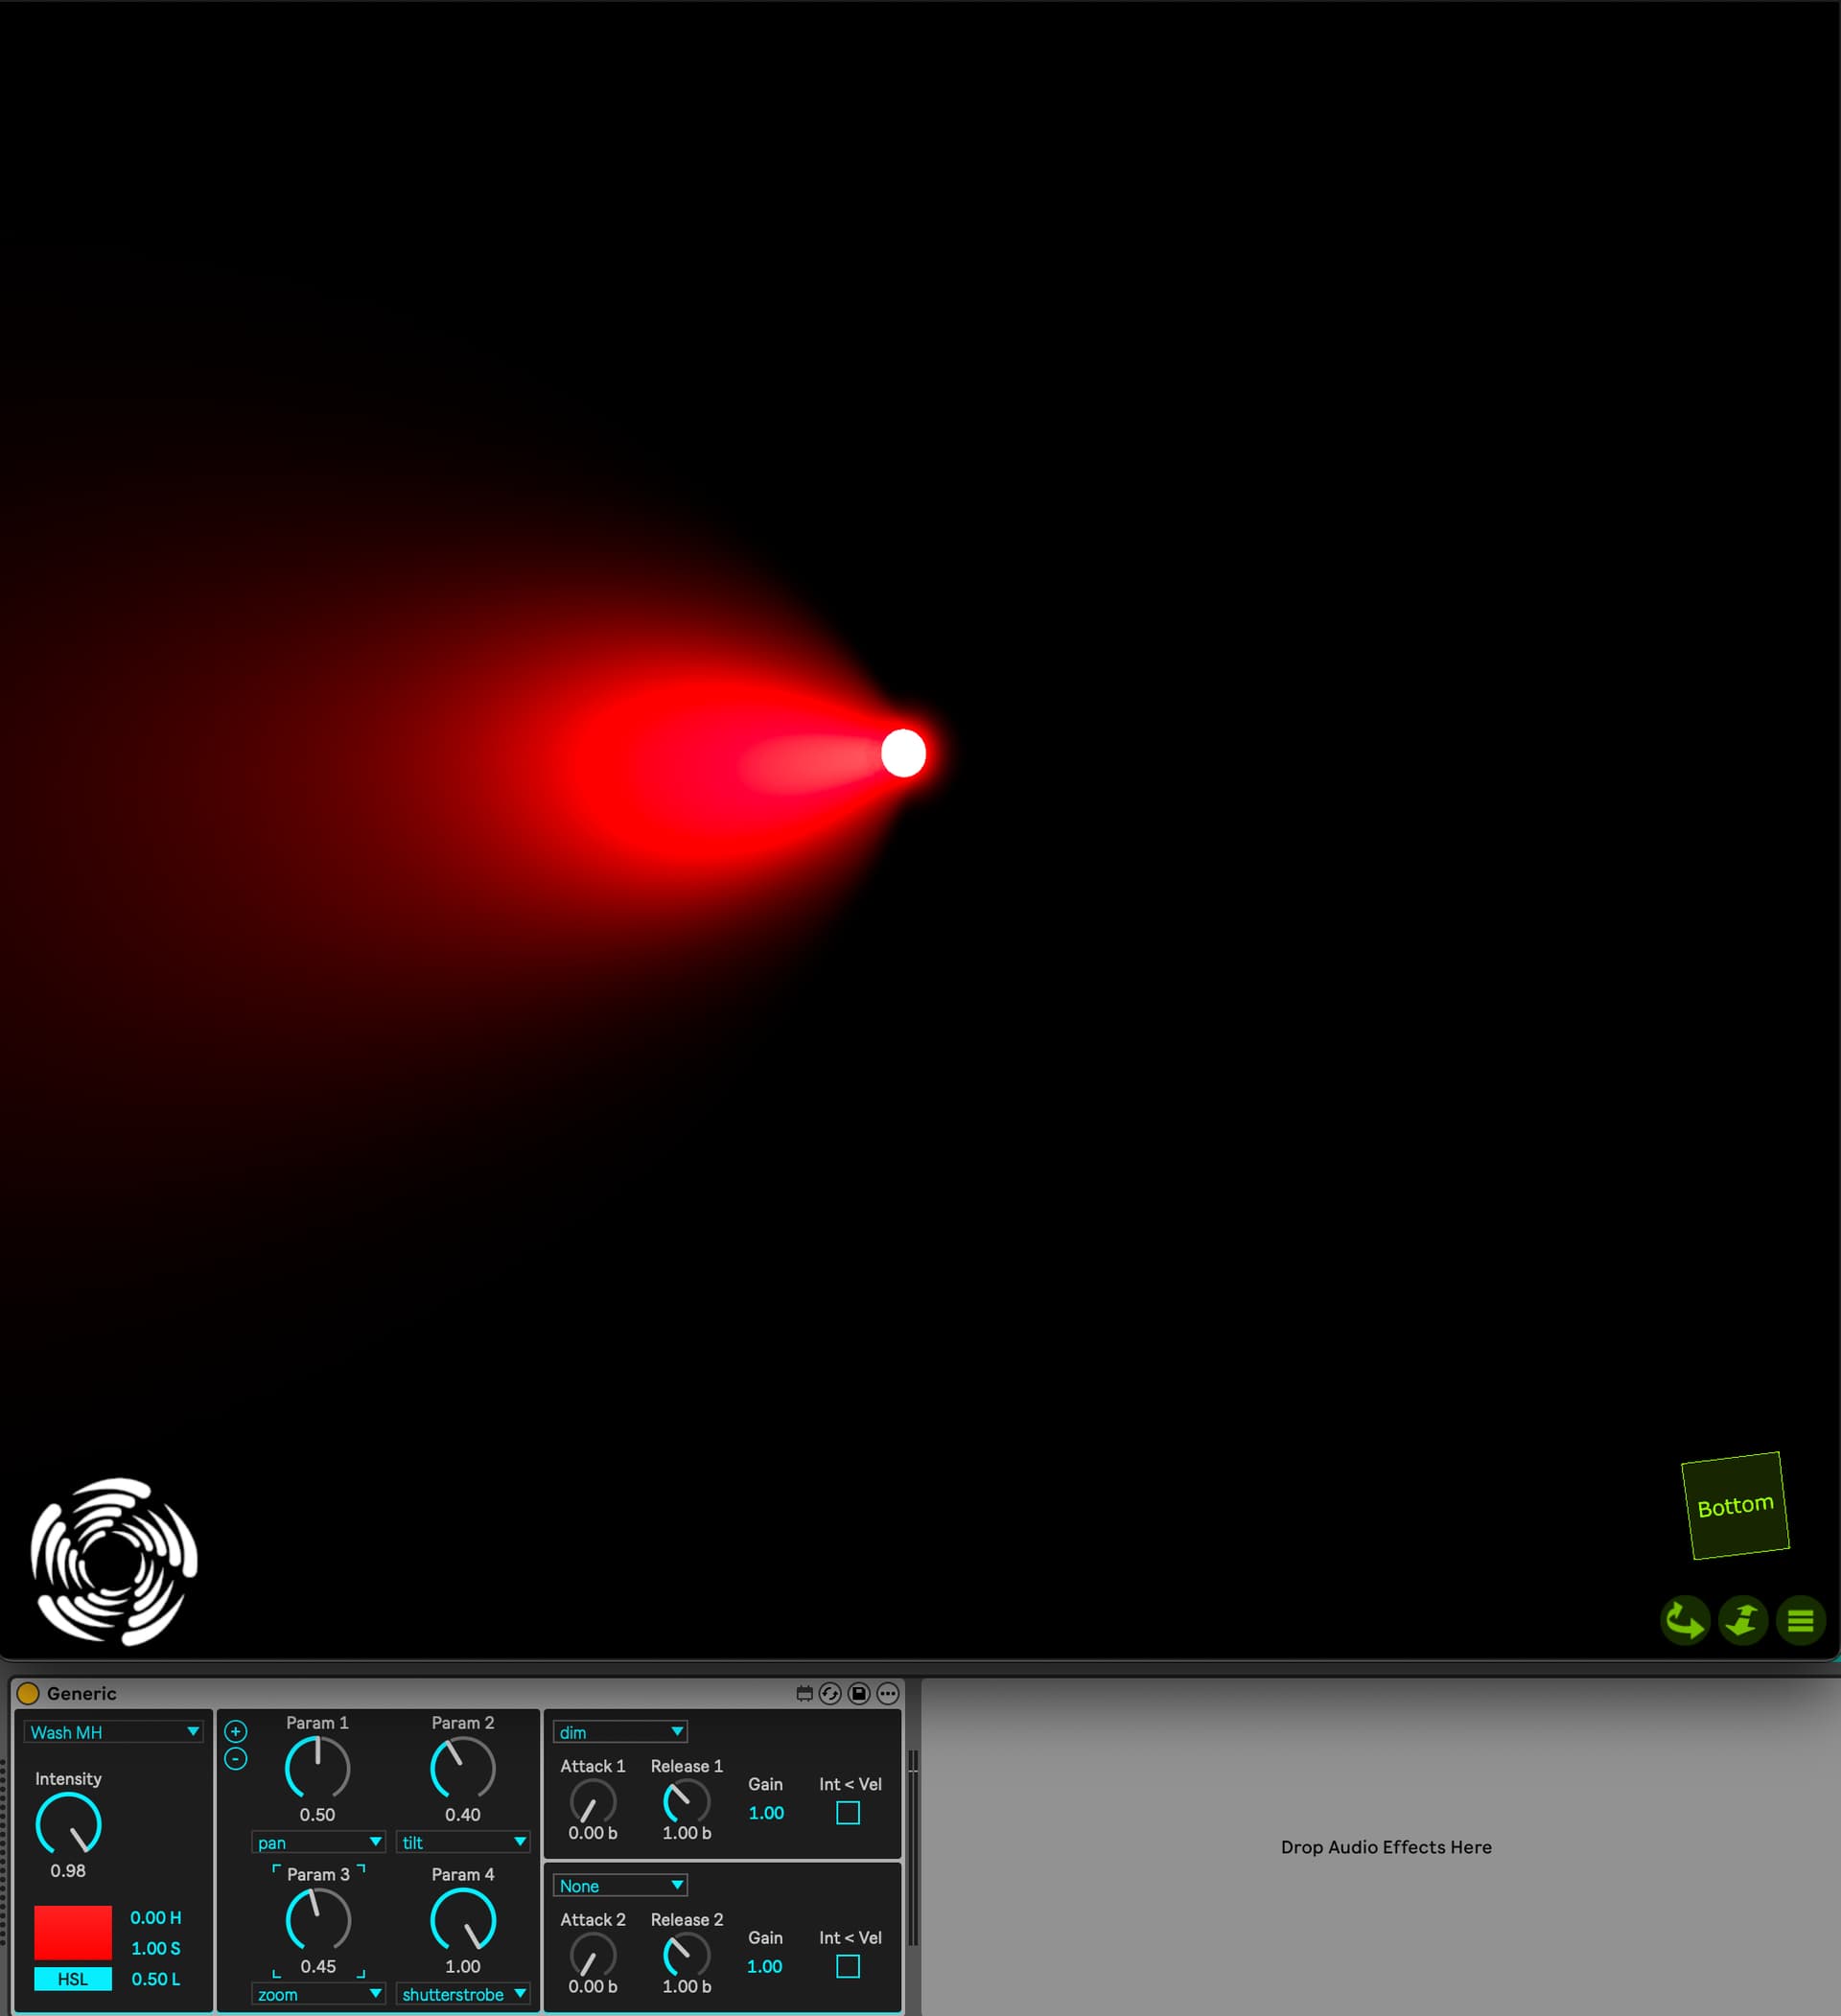
Hope this makes things clearer and you are now able to control your moving head. Please let me know if you have any further questions.
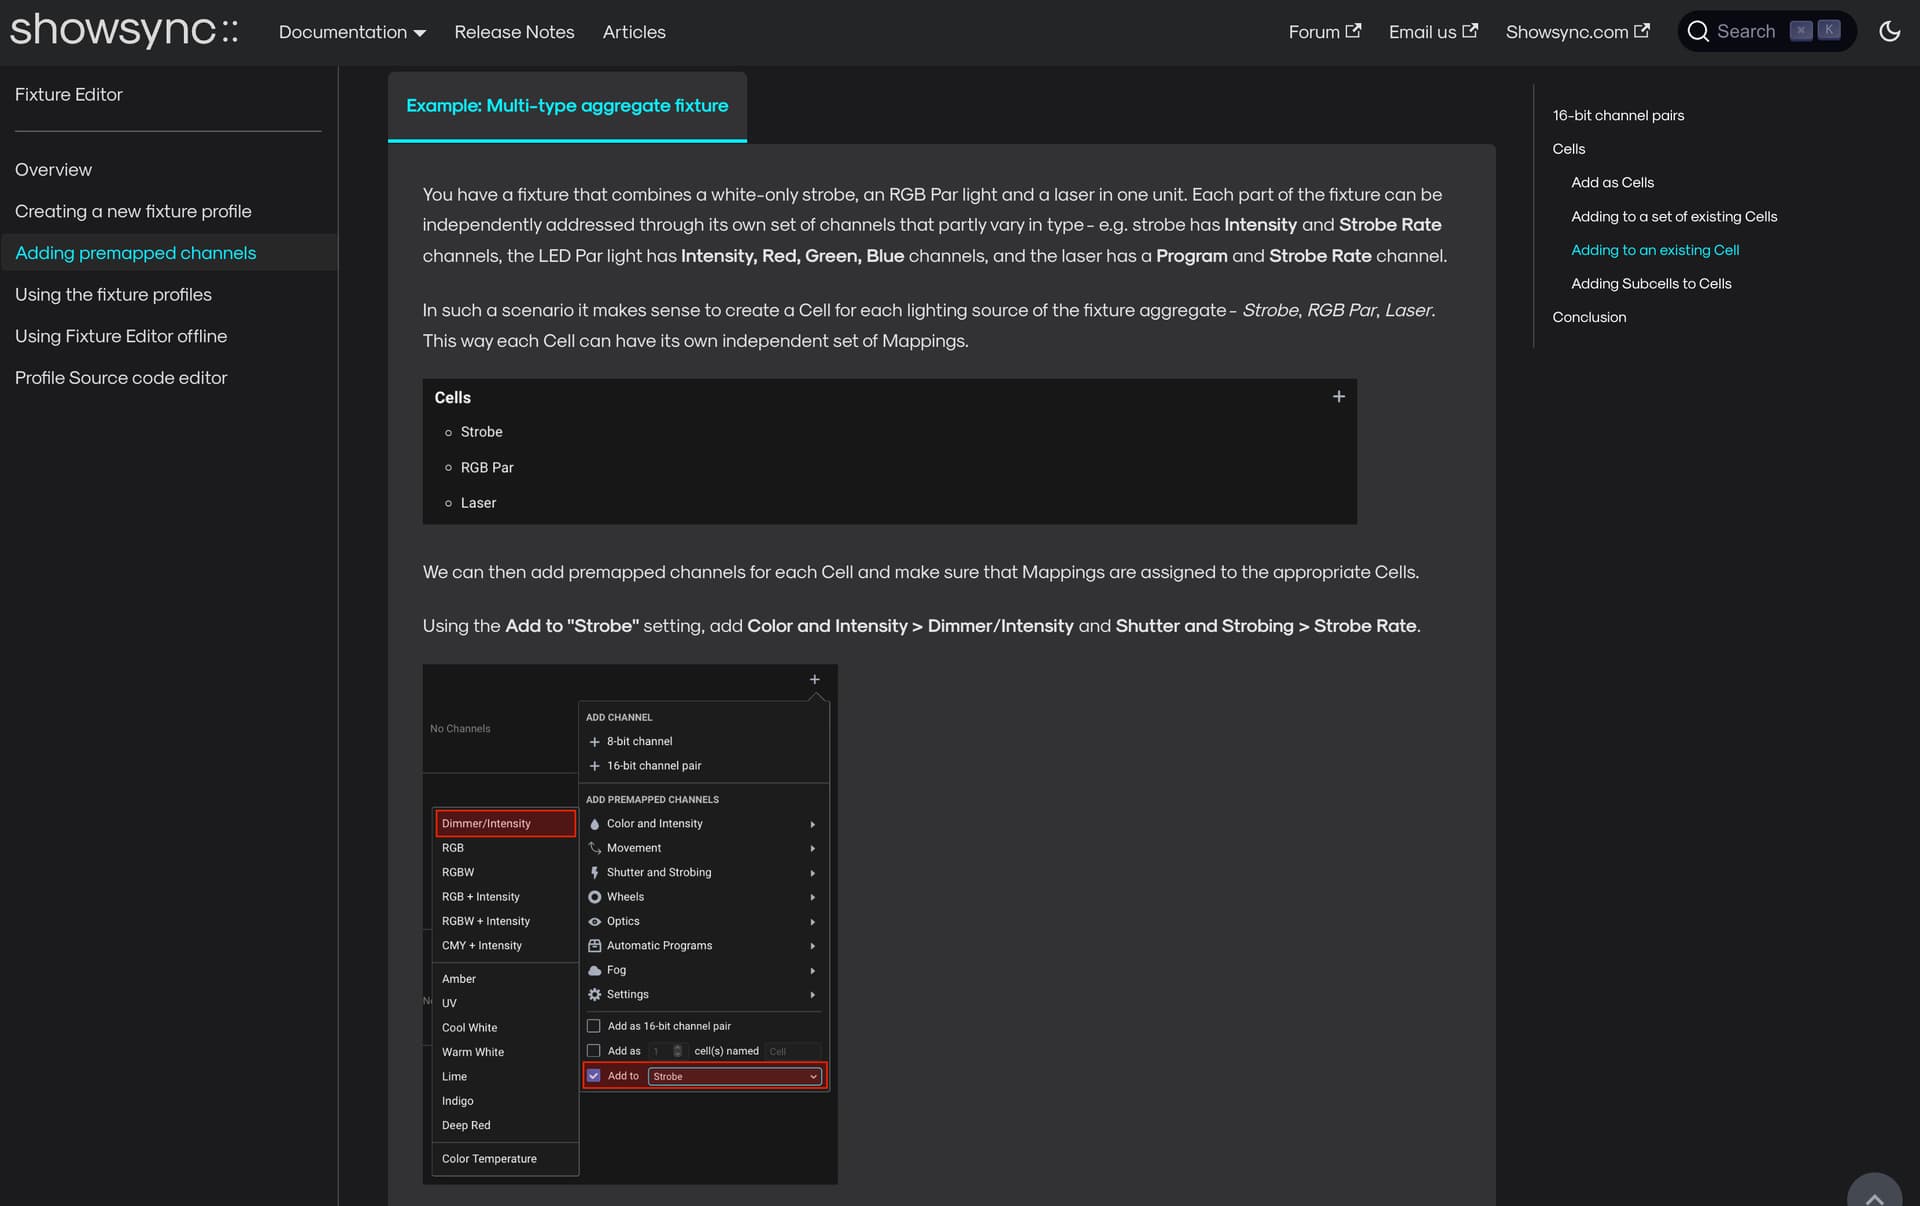
Feel free to share a fixture profile of the Eliminator Furious 5 if you also need help with that. That looks like a multi-type aggregate fixture, consisting of the following sections:
- 4x LED spotlights
- 2x UV lights
- 6x 4-in-1 LEDs
- 1x 5730 White LED
- 1x Red/Green Laser
To get an independent control of each section of this fixture, you will need to map channels relating to each subgroup to separate Cells.
To learn how to do this, check out the sections about Cells in the manual - 1, 2. The second article has an example that addresses this particular fixture type:
Good to hear!
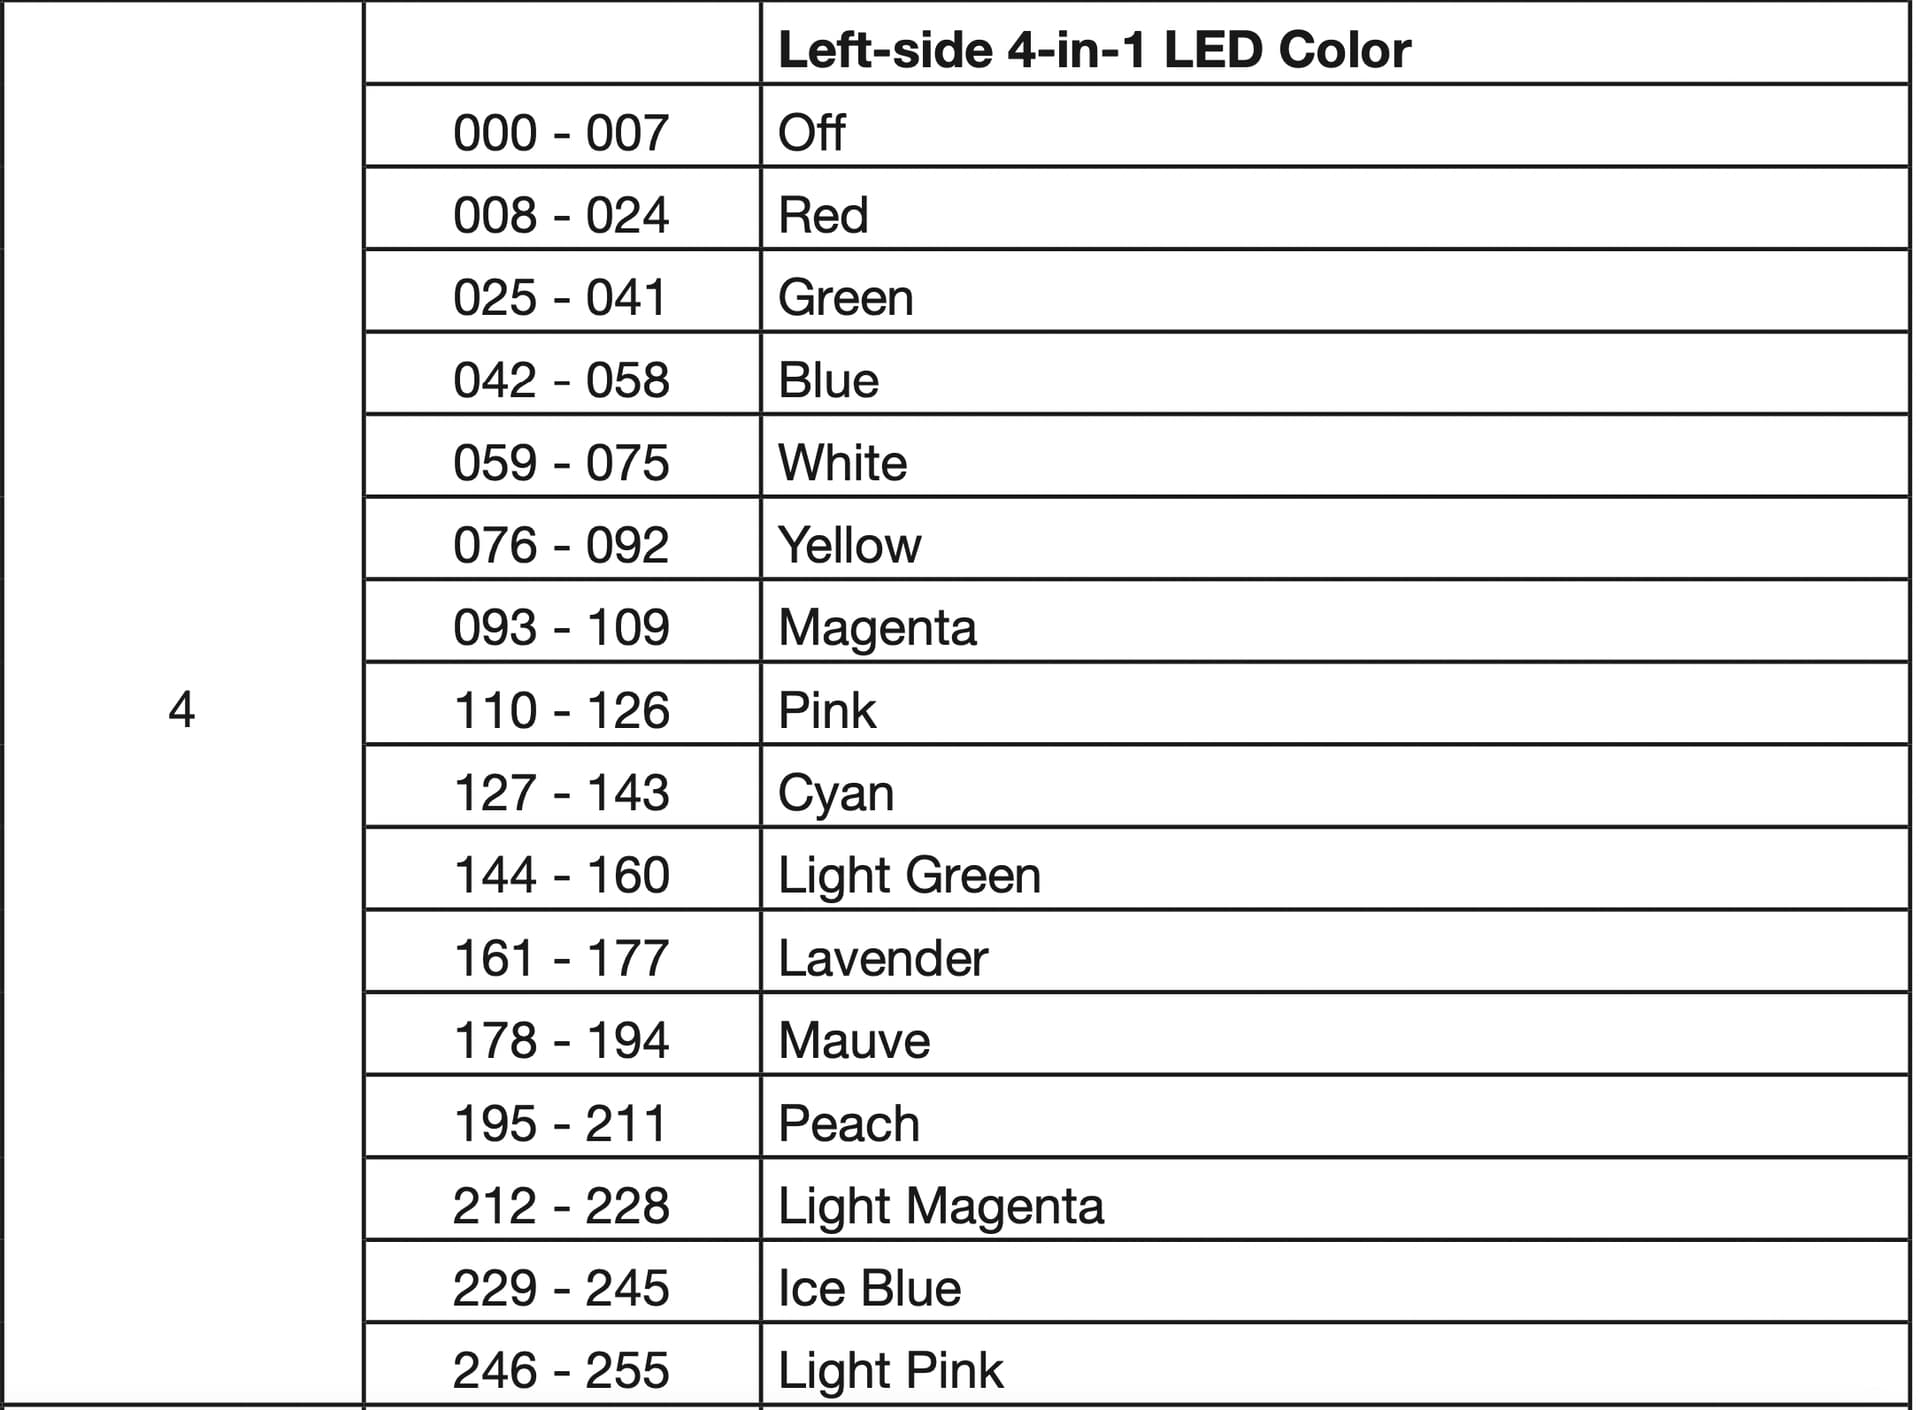
There is currently no special support for slot-based channels like this one, where different DMX values within a single channel activate different functions.
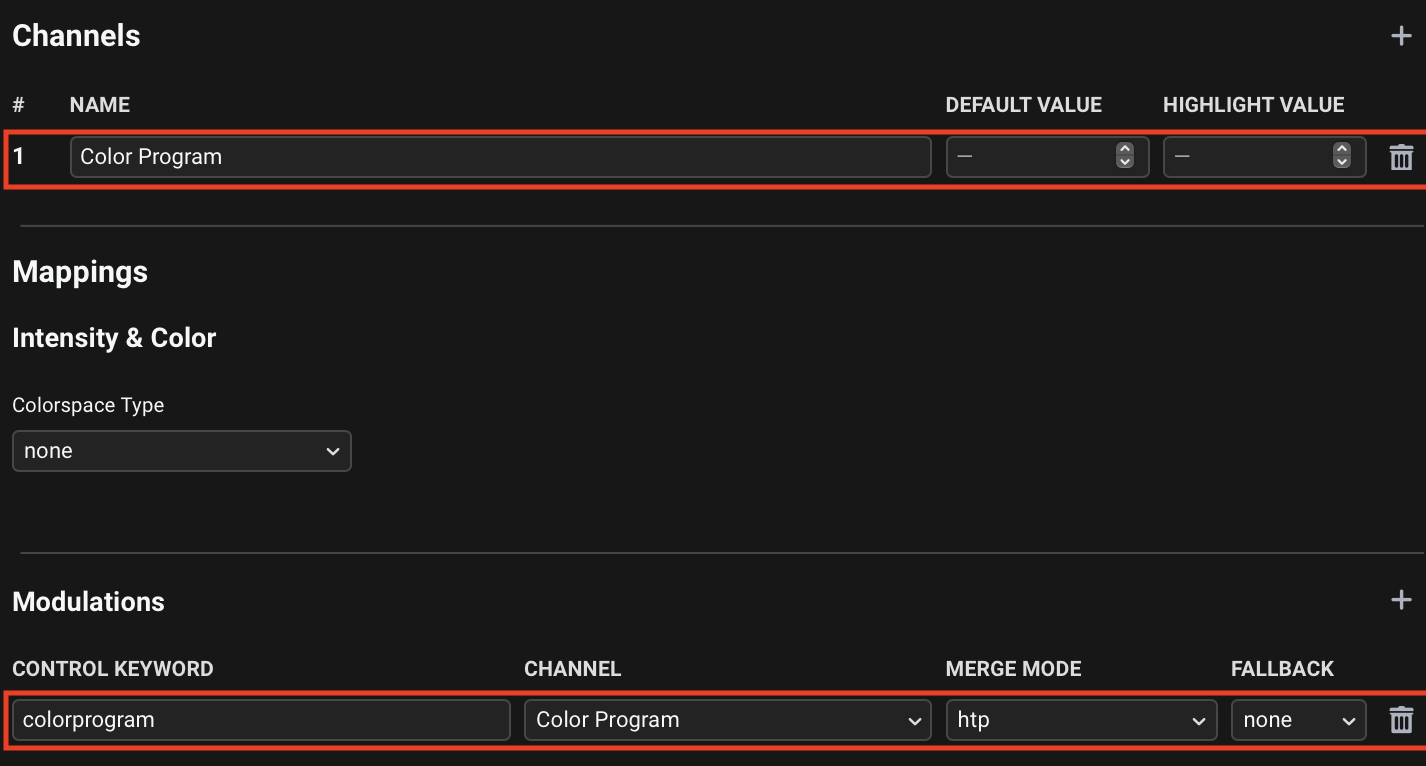
The way to approach mapping such a channel in a fixture profile is by just adding a single channel and assigning a corresponding modulation keyword, using htp (Highest Takes Priority) merge mode. For this channel specifically, you could use the premapped Automatic Programs > Color Program, which maps the channel to colorprogram modulation.
In Beam, you can control the modulation using values between 0. and 1, just like any other parameter. The range 0.-1. maps linearly to the 0-255 DMX range, so you’ll need to find what exact values correspond to the colors you are looking for. You can also use Beam’s Monitor to see what DMX values Beam is outputting.
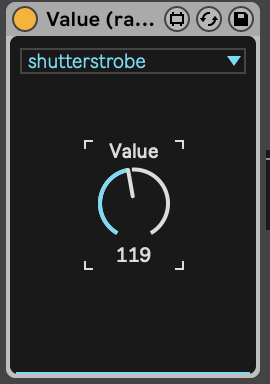
Controlling slot-based channels using modulation values between 0. and 1. can sometimes be inconvenient. You can also:
-
Use a custom device that allows you to control a modulation with values between 0 and 255 (make sure there are no Ranges applied to the target modulation in the Patch): Value (raw DMX values).amxd
-
Make a custom Max for Live device that maps specific slots of your fixture to the corresponding DMX values - this allows you to e.g. automate slots, rather than DMX values. It does require making a dedicated device for every specific fixture’s channel functions, but is simple to do. Here is an Effect device example for controlling an arbitrary parameter
colorwheelof some fixture - you can see the necessary steps if you open the device viaEdit in Max: Slot Effect (colorwheel).amxd (274.9 KB)